The generosity and joy of St. Nicholas
Nov 14, 2018
Voices
Make a miter centerpiece in honor of this bishop who reminds us to care for the poor
The dark winter days of Advent can seem long and endless, especially for little children. Christmas, eagerly anticipated, can seem so far away! So I think it’s wonderful that there are many saints’ feast days to celebrate during this time of waiting and preparation. My family’s favorite is the feast of St. Nicholas on December 6.
St. Nicholas has been revered throughout the centuries and is still widely celebrated today. The patron saint of children and sailors, he is remembered for his anonymous generosity and care for the poor.
In most family celebrations of his feast day, the children set out their shoes the night before so the good bishop can fill them with treats — like candy or chocolates, oranges, maybe even small gifts — while they are sleeping.
The tradition of leaving out shoes may stem from a popular legend about St. Nicholas:
A poor man had three daughters who were unable to marry because he had no money for their dowries. To save the daughters from being sold into slavery, the bishop tossed three bags of gold through the man’s open window at night. The gold is said to have landed in the family’s shoes, drying near the fire.
In my family, instead of setting out our shoes, we have a special drawer for December 6 treats in our set of Advent boxes (see “Advent anticipation,” November 2016). St. Nicholas always brings my children maple-sugar candies, usually the Santa-shaped ones. Some years he has brought other gifts, like St. Nicholas holy cards, warm gloves or beeswax candles.
Beyond the legends, what do we know about St. Nicholas? He was bishop of the Greek city of Myra (now in Turkey) during the fourth century. During the persecution of Christians by the Emperor Diocletian, Nicholas was imprisoned for many years until the rise of Constantine the Great, who made Christianity the official faith of the Roman Empire.
When he died, Nicholas was buried in Myra. During the Muslim conquest of Turkey in 1087, his bones were moved to Bari, Italy, where they remain in the city’s basilica. When St. Nicholas’ crypt needed repairs in the 1950s, the Vatican gave permission for his bones to be examined and photographed. As a result, in 2014, scientists in England unveiled an image of St. Nicholas created through 3-D and facial reconstruction technology.
After his death, devotion to the saintly bishop spread across both Western and Eastern Europe. When Dutch settlers came to this country almost 400 years ago, they brought with them their tradition of celebrating St. Nicholas, whom they called “Sinterklaas.” Over time that morphed in English to “Santa Claus.” My husband and I love to teach our children that Santa Claus and St. Nicholas are one and the same! We emphasize St. Nicholas, however, telling our children that he was a faithful bishop, and a defender of the faith and the poor.
This year, to honor his feast day, I crafted a bishop’s miter that can serve as a table centerpiece, and a smaller version to hang on the Christmas tree.
The feast of St. Nicholas guides our family’s focus on the Christ Child as we approach and celebrate Christmas. St. Nicholas helps us prepare our hearts with joy and reminds us to give generously to the poor.
Weeks later on Christmas morning, we wake to find a letter written by St. Nicholas to the children. It contains personal messages to each child, noting his or her spiritual growth and good qualities of the past year, with encouragement to continue cultivating their virtues. We read the letter before opening any gifts. Then we are fully ready to give and to receive, and to celebrate the gift of Christ.
Exultemus et letemur, Nicolaum veneremur! (Let us be glad and rejoice, let us honor Nicholas!)
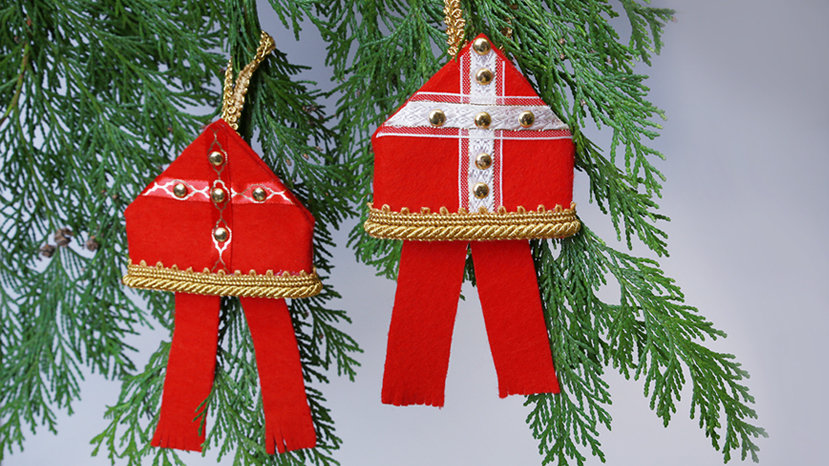
St. Nicholas Miter
Red felt Gold, white or red decorative ribbon, 3/8 to 5/8 wide for ornament; 1 wide for centerpiece Gold braid trim, ½ wide Gold ribbon or trim, 3/8 wide Iron-on gold nail heads, ¼ wide Glue gun, glue sticksChristmas tree ornament
Cut a 4- by 4-inch piece of red felt. Turn the square so its corners point north, south, east and west. Fold the east corner 1¼ inches toward the center and secure with the glue gun. Do the same with the west corner. Fold the bottom (south) point up to meet the north point. Press the fold flat, then open. Dispense glue along the inside edges of the felt. Press together to secure. Cut two 3½-inch pieces of ribbon to form the cross. Center the vertical ribbon, allowing a bit to extend past the top edge of the mi-ter. Glue in place. Place the horizontal crosspiece as desired, making sure the ribbon extends a bit over each side edge. Glue in place. When the glue is dry, trim the ribbons to match the edges of the miter. Cut 7 inches of gold braid trim for the bottom edge of the ornament. Secure with glue as you wrap the trim along the bottom and onto the back. Secure the ends with extra glue. Glue gold nail heads onto the cross-shaped ribbon as desired. Finish the miter with lappets, cloth strips that hang from its back. Cut two ⅞-inch- by 3-inch pieces of red felt. Cut ¼-inch fringe into one end of each strip. Glue the strips in place under the gold braid at the back lower edge of the miter. Create an ornament hanger by cutting 6 inches of gold ribbon or trim. Place the ends together to form a loop. Glue to the back of the miter, 1 inch below the tip.Centerpiece
Note: Similar to the ornament, but on a larger scale.
Cut two 12- by 12-inch pieces of red felt (one for the front, the other for the back). On each square, fold the east and west points in 3 inches toward the center. Glue to secure. Use 1-inch-wide ribbon to decorate one square with a cross. Glue in place and trim edges to match the miter shape. Embellish with gold nail heads as desired. Glue the front and back miter panels together at sides. Press them firmly together until glue dries. Glue ½-inch gold braid trim along both top and bottom edges of the miter, front and back. Cut two 2- by 10-inch strips of red felt for the lappets. Cut two 10-inch strips of the 1-inch ribbon that was used for the cross. Center the ribbon on the felt, and glue in place. Glue the top edges of the lappets to the lower inside back of the miter, angling them out slightly.Northwest Catholic - December 2018